THE KEELBOLTS !
With the keel removed the next issue to address was the condition of the keel bolts which turned out to be very poor indeed. The condition of the bolts was so bad that the only option was total replacement. The following photos tell the whole story


What could have caused this damage to the bolts ?
I guess electrolysis would be one possible explanation. Another explanation and the reason I think this happened is a condition called Crevice Corrosion. Crevice Corrosion is a situation in which stainless steel can be slowly destroyed under certain unique conditions. For this to happen stainless steel has to be immersed in salt water that is depleted of oxygen. Oxygen is what helps stainless steel keep its non-corrosive property’s. Without oxygen to protect it stainless steel will eventually corrode away. When this keel was first attached there was no protective calking put in the holes that the bolts were put in. The void in those holes eventually filled with water which sat there for years surrounding the bolts. The oxygen in this water trapped under the washers disappeared as the water became foul and polluted. When I took the Nuts off these bolts and exposed the water to the air it filled the entire boat with a smell that the boatyard guys had smelled before and was an incredibly bad and distinct smell. The following pictures show pictures of the bilge with some of the nuts removed from the bolts notice some of the holes with no calking.


Notice the picture on the right, the nut and washer never really sat flat on the surface under it. Not the best construction in this particular case.
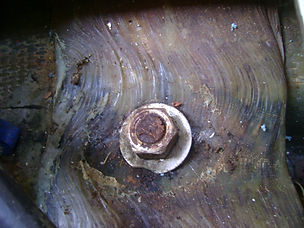
Same nut top view (aft bolt # 7)
Below this is bolt number 2 Counting from the front bolt . ( 7 bolts in all one ¾ and six 1” bolts)
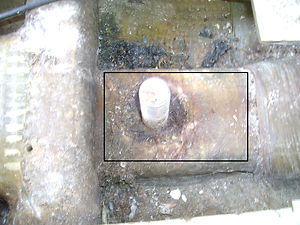


Look at these 3 pictures and what you see is a bolt surrounded by a piece of wood encased in fiberglass mat. The wood of course is very damp but not soaking wet. This is another festering mess that will only get worse! Over the years the nut was tightened over and over and it eventually the washer cut its way through the fiberglass matt exposing the wood block underneath.
The fix I used for this problem was to cut the glass off the top of the wood block.
I cut from the edge of the rib, which is the raised area on the left side of the center picture to the slightly raised area on the right side of the picture. I was then able to lift that square piece of fiberglass off the top of the wood block. For days I had a dehumidifier running inside the cabin to get as much moisture out as possible. Eventually the wooden block became dry and crispy and it seamed solid enough to reuse. I drilled several holes into the wood at varying depths and continued to dry the area out. After a few weeks I bought some clear penetrating epoxy and kept pouring it on top of the wooden block. After about 4 or 5 treatments of this epoxy it no longer was being absorbed by the wood the holes I drilled no longer let the epoxy sink into the middle of the block and I just let it cure for a week or so. The block of wood was now as solid as a rock and I glassed over the top of it with a few layers West System Episize Biaxial glass. (More about working on the bilge a little later on)
While this was going on the keel had been sent out to have all new keel bolts installed, now a little bit about that process